プログラミング初心者でもやってみたい!作った理由とか!
たのしいクソザコプログラミング!九龍です!
小学生にもだいにんきの職業、『プログラマ』になりたい!
………というワケでもなくただただ趣味でchat GPTに手取り足取り教えてもらいながらコードを書いてみることをたのしんでいます。
この記事では
- ChatGPTでのプログラミングってどういう感じ?初心者でも出来る?
- 作ったスクリプトの機能・目的を紹介!
- 作ったスクリプトのコードを公開!
という感じご紹介していきます!
ChatGPTを使ったプログラミングは「自分で挫折する場所を決めれる」ぐらいお手軽で簡単です。
この記事を読めばなんとなく日々の小さなアレコレを解決するスクリプトぐらいなら、
サクッと作れるイメージが湧いてくるかも……!です!
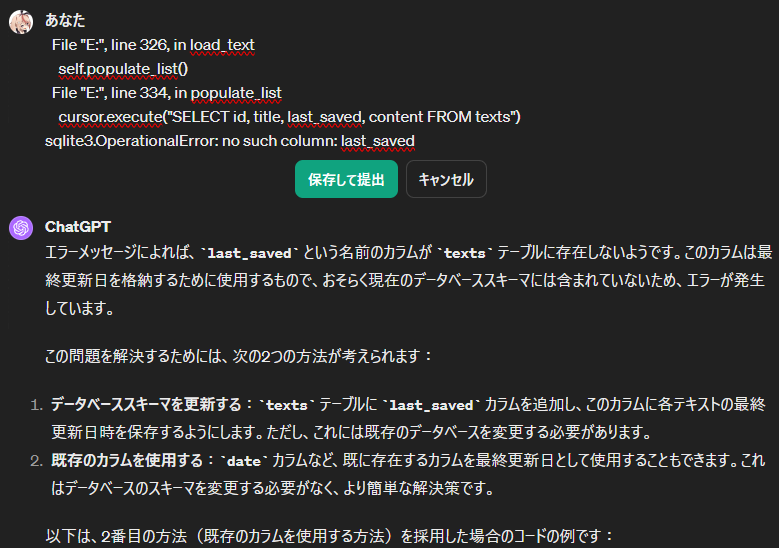
プログラミング初心者の天敵!英語だらけのエラーメッセージもこわくない!
chatGPTを使ったプログラミングの一番のメリットは間違いなくこれです!
一緒にコーディングしているセッション内であれば、
エラーメッセージをコピーペーストするだけで適切な対処を教えてくれます。
自分が実装したい機能をイメージしながら文章で伝えて、エラーが起きたらその都度エラーメッセージを伝えるだけでコーディングを前に進めることが出来ます。

使う言語さえ決めてしまったら挫折するポイントまでひたすら進められます!
もし挫折してしまったら「貴方(chat GPT)はPM歴10年の最強つよつよエンジニアです、アドバイスをください」
…みたいなプロンプトを与えた新しいセッションでアドバイスをもらえばだいたい解決します!
今回作ったスクリプトの機能と目的!
画像を一度に何枚も生成する画像生成AIと相性がよいとされるアプリケーションとして紹介されていた人気(?)アプリケーションeagleを運用していたのですが、このアプリケーションにはいくつか問題がありました。
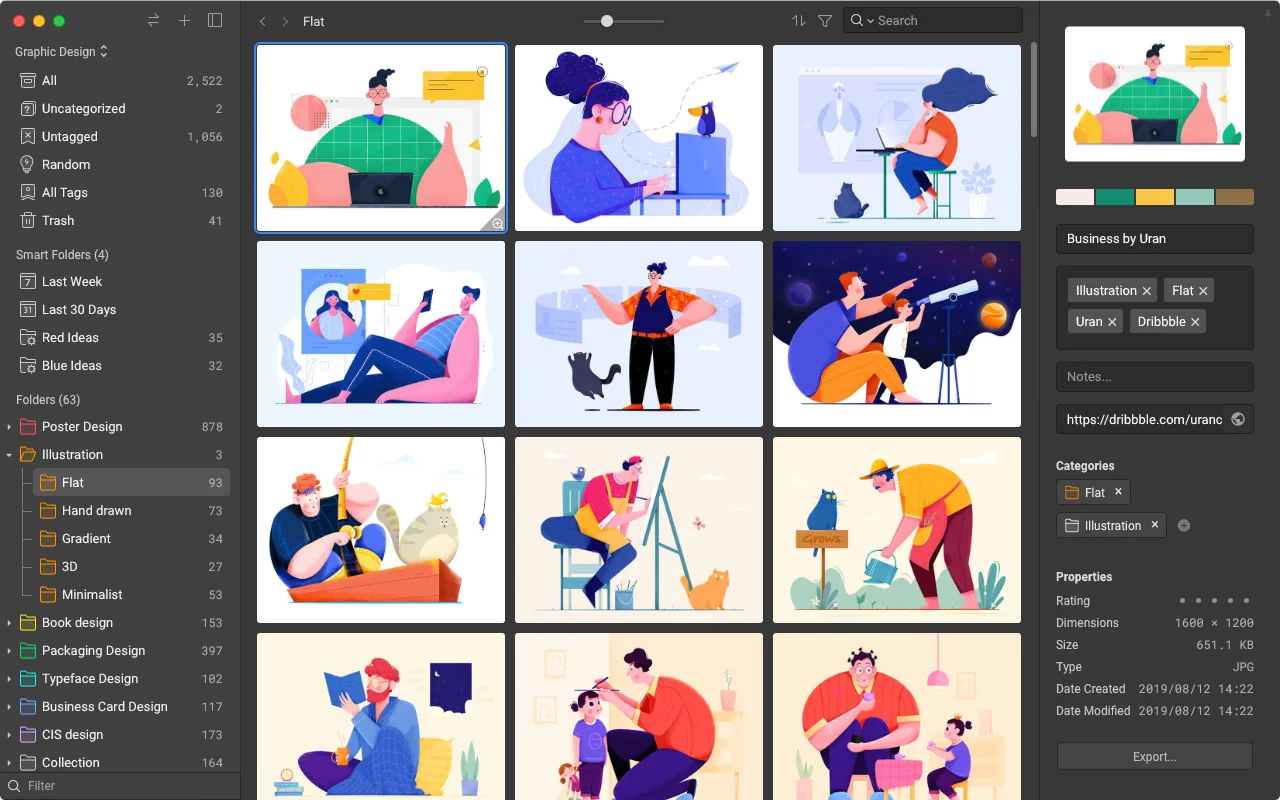
UIもとても見やすく綺麗で直感的に使えて、画像を整理するために必要な機能はそろっているのですが!
- 起動時に画像をすべて読み込んでいる?のかそこそこ重い
- 読み込まれた元画像のファイルパスを表示することができない
- 画像整理のためのタグ付けが非常に面倒
ぜんぶちゃんと不便なのですが、中でも便利に画像を整理するためのタグ付けが
「一枚一枚画像を表示しながら自分で考えたタグをくっつけていく」という仕方がないとはいえ面倒すぎる仕様でした。
そんなことやってられないです!!めんどい!!
画像生成AIで生成した画像ファイルをバイナリファイルとして扱うと、画像の特徴量を詳細に説明した英単語の羅列=プロンプトがあるため、画像+バイナリファイルから抽出した英単語を同時にデータベースに保存する処理を作れば画像の特徴量検索に対応したスクリプトが作れそうです!

今回のスクリプトの紹介のために生成した画像を
バイナリファイルとして読み込むと……

『starry night sky background』(星空の背景)のような記述があります。
実装した機能とコードはこんなかんじ!
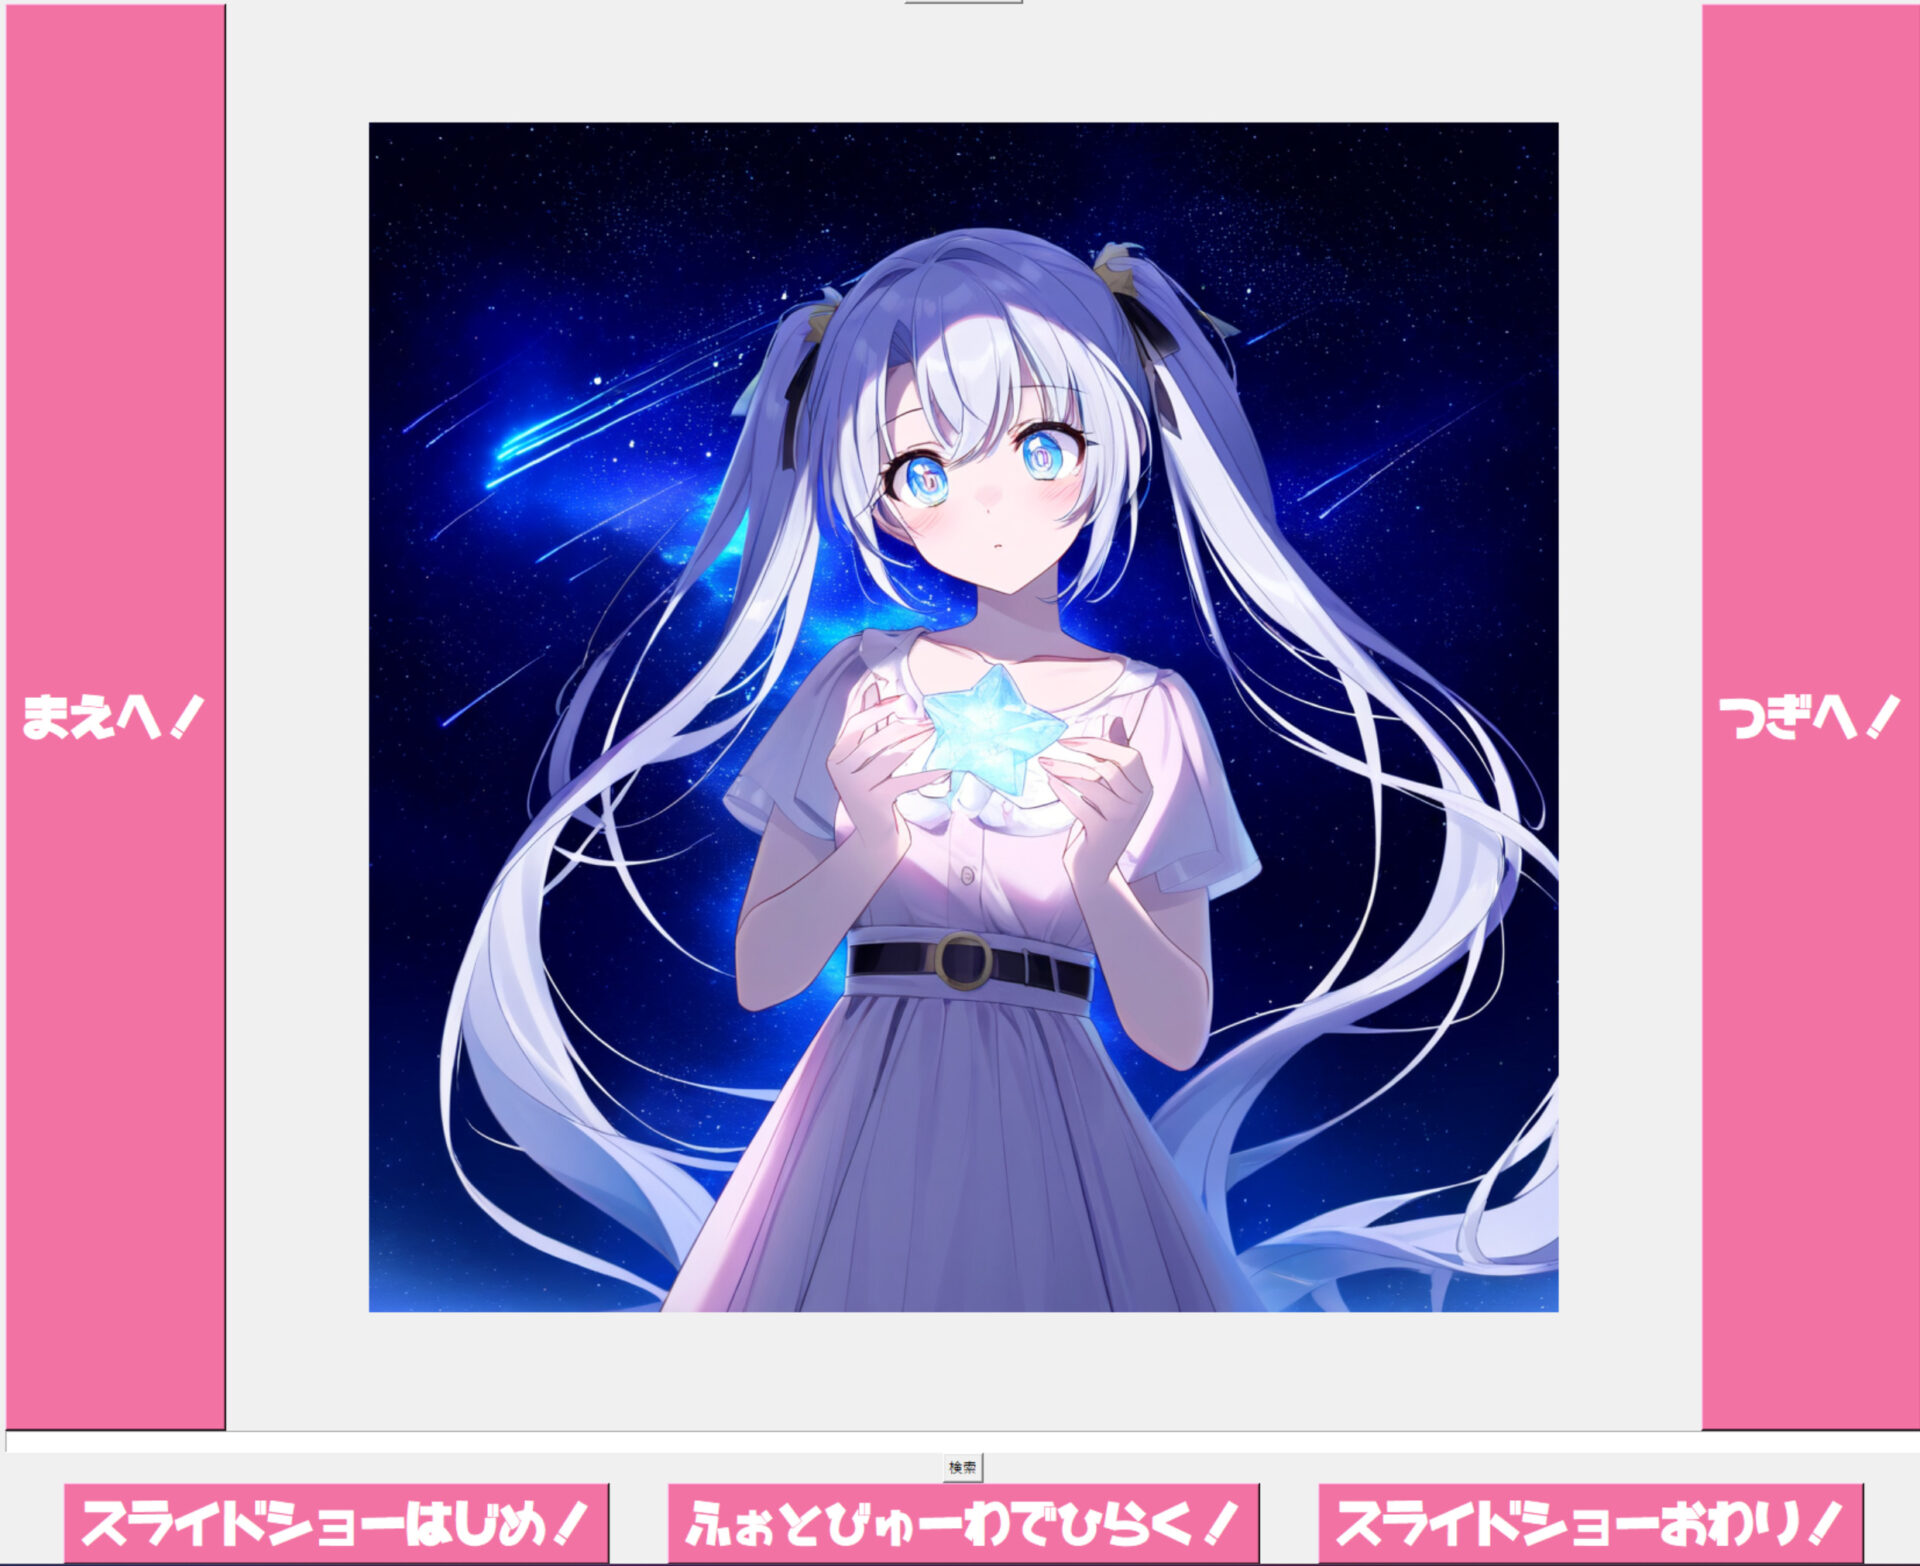
今回のコードはtkinterで簡易的なGUIを実装してみることにしました。
はじめての実装だったのでかなり大雑把なクソダサUIになっています。
恥ずかしいですがこれも初心者の遺産ということで残しておきましょう……!
import sqlite3
import os
import datetime
from tkinter import simpledialog, Tk, Label, Button, Entry, Frame, Text, TOP, X, LEFT, RIGHT, BOTH, Y, END
from PIL import Image, ImageTk
import io
import tempfile
import subprocess
import re
import tkinter as tk

# データベースファイルのパスを設定
db_path = os.path.join(os.getcwd(), 'mydatabase.db')

def create_db_and_table():
    """ データベースとテーブルを作成する """
    try:
        with sqlite3.connect(db_path) as conn:
            cursor = conn.cursor()
            cursor.execute('''
            CREATE TABLE IF NOT EXISTS images (
                id INTEGER PRIMARY KEY,
                name TEXT,
                image BLOB,
                text_content TEXT,
                updated_at TEXT
            );
            ''')
    except sqlite3.Error as e:
        print(f"データベースエラー: {e}")

def add_updated_at_column():
    """ 'updated_at' カラムを 'images' テーブルに追加する。カラムが既に存在する場合は何もしない。 """
    try:
        with sqlite3.connect(db_path) as conn:
            cursor = conn.cursor()
            cursor.execute("PRAGMA table_info(images);")
            columns_info = cursor.fetchall()
            if not any(column_info[1] == 'updated_at' for column_info in columns_info):
                cursor.execute('ALTER TABLE images ADD COLUMN updated_at TEXT')
    except sqlite3.Error as e:
        print(f"データベースエラー: {e}")


def format_date(timestamp):
    return datetime.datetime.fromtimestamp(timestamp).strftime('%Y-%m-%d')


def fetch_images_by_keyword(keyword):
    """ キーワードに基づいて関連する画像のバイナリデータを取得 """
    conn = sqlite3.connect(db_path)
    cursor = conn.cursor()
    cursor.execute("SELECT image FROM images WHERE text_content LIKE ?", ('%' + keyword + '%',))
    images = cursor.fetchall()
    conn.close()
    return [img[0] for img in images] if images else []

def fetch_images_by_date(date_query):
    conn = sqlite3.connect(db_path)
    cursor = conn.cursor()
    cursor.execute("SELECT image FROM images WHERE updated_at LIKE ?", ('%' + date_query + '%',))
    images = cursor.fetchall()
    conn.close()
    return [img[0] for img in images] if images else []


def create_temp_image_files(image_streams):
    """ 画像ストリームから一時的な画像ファイルを作成し、そのパスを返す """
    temp_files = []
    for image_stream in image_streams:
        temp_file = tempfile.NamedTemporaryFile(delete=False, suffix='.png')
        temp_file.write(image_stream.read())
        temp_file.close()
        temp_files.append(temp_file.name)
    return temp_files

def extract_text_from_binary(binary_data):
    """ バイナリファイルから英単語を抽出する(2000文字まで) """
    text_content = ' '.join(re.findall(r'\b[a-zA-Z]+\b', str(binary_data)[:2000]))
    return text_content

def save_image_with_text_and_date(directory):
    """ 指定されたディレクトリから画像を読み込み、データベースに保存する """
    try:
        for filename in os.listdir(directory):
            if filename.endswith('.png'):
                image_path = os.path.join(directory, filename)
                image_name = os.path.splitext(filename)[0]
                updated_at = format_date(os.path.getmtime(image_path))

                with open(image_path, 'rb') as file:
                    blob_image = file.read()

                text_content = extract_text_from_binary(blob_image)

                with sqlite3.connect(db_path) as conn:
                    cursor = conn.cursor()
                    cursor.execute('SELECT id FROM images WHERE name = ?', (image_name,))
                    if not cursor.fetchone():
                        cursor.execute('''
                            INSERT INTO images (name, image, text_content, updated_at)
                            VALUES (?, ?, ?, ?)
                        ''', (image_name, blob_image, text_content, updated_at))
    except Exception as e:
        print(f"エラー発生: {e}")

save_image_with_text_and_date("インポートしたい画像ファイルのパスを記述してください")

def create_image_viewer(root, image_blobs):
    # 画像インデックス
    index = 0
    slideshow_running = False
    current_temp_file = None
    temp_files = []
    image_label = tk.Label(root)  # この行を追加
    image_label.pack(side=tk.LEFT, fill=tk.BOTH, expand=True)

    def show_image(idx):
        nonlocal current_temp_file
        if current_temp_file:
            os.unlink(current_temp_file.name)
            current_temp_file = None

        image_data = io.BytesIO(image_blobs[idx])
        image = Image.open(image_data)

        screen_width = root.winfo_screenwidth()
        screen_height = root.winfo_screenheight()
        # 画像のサイズが512x768の場合、4K解像度に適合するように拡大
        if image.size == (512, 768):
            new_width = int(image.width * 1.75)
            new_height = int(image.height * 1.75)
            image = image.resize((new_width, new_height), Image.ANTIALIAS)
            # ここでボタンを再配置
            slideshow_button.pack_forget()
            stop_slideshow_button.pack_forget()
            photo_viewer_button.pack_forget()

            slideshow_button.pack(side=tk.LEFT, padx=10, in_=button_frame)
            stop_slideshow_button.pack(side=tk.RIGHT, padx=10, in_=button_frame)
            photo_viewer_button.pack(fill=tk.X, in_=button_frame)


        else:
            # 通常の画像サイズの場合、ボタンを元の位置に戻す
            slideshow_button.pack_forget()
            stop_slideshow_button.pack_forget()
            photo_viewer_button.pack_forget()
            slideshow_button.pack(side=tk.LEFT, padx=50, in_=button_frame)
            stop_slideshow_button.pack(side=tk.RIGHT, padx=50, in_=button_frame)
            photo_viewer_button.pack(fill=tk.X, in_=button_frame)


        photo = ImageTk.PhotoImage(image)
        image_label.config(image=photo)
        image_label.image = photo


        # 現在の画像を一時ファイルに保存
        current_temp_file = tempfile.NamedTemporaryFile(delete=False, suffix='.png')
        image.save(current_temp_file, format="PNG")
        temp_files.append(current_temp_file.name)
        current_temp_file.close()


    # Windowsフォトビューアで画像を開く
    def open_in_photo_viewer():
        if current_temp_file:
            subprocess.run(['explorer', current_temp_file.name], check=True)

    # 次の画像を表示
    def next_image():
        nonlocal index
        index = (index + 1) % len(image_blobs)
        show_image(index)

    # 前の画像を表示
    def prev_image():
        nonlocal index
        index = (index - 1) % len(image_blobs)
        show_image(index)
    is_slideshow = False
    # スライドショーのループ
    def slideshow():
        nonlocal is_slideshow
        if is_slideshow:
            next_image()
            root.after(3000, slideshow)  # 3秒ごとに次の画像へ

    # スライドショー開始
    def start_slideshow():
        nonlocal is_slideshow
        is_slideshow = True
        slideshow()
        #hide_buttons()

    # スライドショー停止
    def stop_slideshow():
        nonlocal is_slideshow
        is_slideshow = False
        show_buttons()


    def show_buttons():
        prev_button = tk.Button(image_frame, text="まえへ!", command=prev_image, **button_style)
        prev_button.pack(side=tk.LEFT, fill=tk.Y)
        next_button = tk.Button(image_frame, text="つぎへ!", command=next_image, **button_style)
        next_button.pack(side=tk.RIGHT, fill=tk.Y)

    # ボタンのスタイルを設定
    button_style = {'font': ('はらませにゃんこ', 30), 'bg': '#F172A3', 'fg': 'white'}

    # ボタンと画像表示用のフレーム
    image_frame = tk.Frame(root)
    image_frame.pack(side=tk.TOP, fill=tk.BOTH, expand=True)

    # "前へ"ボタン
    prev_button = tk.Button(image_frame, text="まえへ!", command=prev_image, **button_style)
    prev_button.pack(side=tk.LEFT, fill=tk.Y)

    # 画像表示用のラベル
    image_label = tk.Label(image_frame)
    image_label.pack(side=tk.LEFT, fill=tk.BOTH, expand=True)

    # "次へ"ボタン
    next_button = tk.Button(image_frame, text="つぎへ!", command=next_image, **button_style)
    next_button.pack(side=tk.RIGHT, fill=tk.Y)

    # 下部のボタン用フレーム
    button_frame = tk.Frame(root)
    button_frame.pack(side=tk.BOTTOM, fill=tk.X)

    # スライドショー開始・停止ボタン
    slideshow_button = tk.Button(button_frame, text="スライドショーはじめ!", command=start_slideshow, **button_style)
    slideshow_button.pack(side=tk.LEFT, padx=10)
    stop_slideshow_button = tk.Button(button_frame, text="スライドショーおわり!", command=stop_slideshow, **button_style)
    stop_slideshow_button.pack(side=tk.RIGHT, padx=10)

    # フォトビューアで開くボタン
    photo_viewer_button = tk.Button(button_frame, text="ふぉとびゅーわでひらく!", command=open_in_photo_viewer, **button_style)
    photo_viewer_button.pack(fill=tk.X)


    def on_closing():
        # 一時ファイルを削除
        for temp_file in temp_files:
            if os.path.exists(temp_file):
                os.unlink(temp_file)
        root.destroy()

    root.protocol("WM_DELETE_WINDOW", on_closing)


def search_and_display_images(query, root):
    """ キーワードまたは日付に基づいて画像を検索し、表示する """
    if query.isdigit():  # 日付検索(形式の例: '20230101')
        image_blobs = fetch_images_by_date(query)
    else:  # キーワード検索
        image_blobs = fetch_images_by_keyword(query)

    # 画像ビューアの既存のウィジェットをクリア
    for widget in root.winfo_children():
        widget.destroy()

    if image_blobs:
        # 該当する画像の件数を通知
        tk.Label(root, text=f"該当する画像が {len(image_blobs)} 件見つかりました。").pack()
        create_image_viewer(root, image_blobs)
    else:
        # 該当する画像がない場合のメッセージを表示
        tk.Label(root, text="該当する画像がありません。再度検索してください。").pack()

    # 検索バーとボタンを再表示
    create_search_ui(root)

def create_search_ui(root):
    """ 検索UIを作成する """
    keyword_entry = tk.Entry(root)
    keyword_entry.pack(side=tk.TOP, fill=tk.X)
    search_button = tk.Button(root, text="検索", command=lambda: search_and_display_images(keyword_entry.get(), root))
    search_button.pack(side=tk.TOP)
def search_images(keyword_entry, root):
    # 検索ボタンが押されたときの処理
    query = keyword_entry.get()
    search_and_display_images(query, root)

# 初回の検索窓を表示するウィンドウを作成
def init_search_window():
    root = tk.Tk()
    root.title("画像ビューア")
    create_search_ui(root)
    return root

root = init_search_window()
root.mainloop()
免責事項
このコードは個人的な学習プロジェクトの一環として提供されており、その動作や効果についていかなる保証もいたしません。
使用は自己責任でお願いします。
機能紹介
見たままの機能が実装されています!
起動すると検索窓が開き、検索キーワードを入力すると該当する件数分の画像を閲覧することができます。
「ふぉとびゅーわでひらく!」をクリックするとwindows標準の「フォト」で画像が開かれます。
「スライドショーはじめ!」をクリックすると三秒ごとに画像が切り替わります。
…紹介する機能はこれでおしまいです!笑
見た目通りのシンプルなコードです。
今回はプログラミングをすこし勉強していたときの知識を思い出しながら、PythonとSqliteで画像を整理しなくても整理できる簡易的なビューワーを作ってみました。
ここの実装が思いつけたのが個人的にはとてもたのしかったです!
def extract_text_from_binary(binary_data):
""" バイナリファイルから英単語を抽出する(2000文字まで) """
text_content = ' '.join(re.findall(r'\b[a-zA-Z]+\b', str(binary_data)[:2000]))
return text_content
…ここだけなんですけれど!
これまでに作ったスクリプトはコンソールで動作するつまらないものだったので、UIが作れて個人的にはとてもまんぞくでした。
世の中のかっけーUIを作ってる人のスゴさが身に染みました…!
これからもちょくちょくプログラミングには挑戦していくと思うので生暖かい目で見守ってくださるとうれしいです!
最後までお読みいただきありがとうございました~!